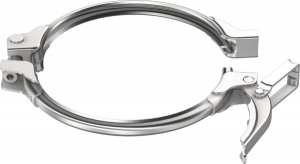
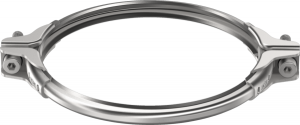
Pull-rings are used in conjunction with U-shaped seals to connect pipe components and pressed
components with a 6 mm lip.
The use of different U-shaped seal profiles enables the same pull-ring to be used with 1 to 2 mm thick pipe components and pressed components.
To meet the different requirements of every system, JACOB offers a comprehensive and wide-ranging
standard range which covers most requirements.
U-shaped seals
| Profile for 1 mm wall thickness | Profile for 2 and 3 mm wall thickness | |||||||
|---|---|---|---|---|---|---|---|---|
| NBR, silicone, Viton | EPDM conductive | NBR, silicone, Viton, EPDM conductive For 3 mm wall thickness, the use of U-shaped seals made of NBR or silicone is recommended. Only in conjunction with the pull ring for 3 mm pipework. | ||||||
 |
||||||||
| Pipework component B | Wall thickness pipework component A | Wall thickness pipework component A | Wall thickness pipework component A | |||||
| 1 mm | 1,5 mm | 2 mm | 1 mm | 1,5 mm | 2 mm | 2 mm | 3 mm | |
| 1 mm | ∎ | ∎ | ∎ | |||||
| 1,5 mm | ∎ | ∎ | ∎ | |||||
| 2 mm | ∎ | ∎ | ∎ | ∎ | ||||
| 3 mm | ∎ | ∎ | ||||||
Pull rings
| QUICK CONNECT pull-ring | Pull-ring (without sealant) |
|---|---|
 |
 |
• Repair damaged lipped ends (e.g. align)
• Eliminate any unevenness from the lipped end
• Assemble the pipework tension-free
• Ensure when fitting the pull-ring that the U-shaped seal does not bunch or fold
• Support horizontal tubing approximately every 4 meters. If there are multiple short pipework components in the pipeworl line, the interval between supports should be reduced
• Attach branch components so that they do not generate any tension in the main pipework line
• Tighten the bolts of two-parted pull-rings evenly on both sides
• Re-tighten the pull-rings after 24 hours to ensure they are as leak-proof as possible
Note: To connect JACOB pipe components with a 6 mm lip. A U-shaped seal and a pull-ring are needed for each
connection. You need a 6 mm hexagon cap screwdriver to mount the pull-rings.
Step 1
Attach a U-shaped seal over one of the lipped tube ends.
• The U-shaped seal must be slightly stretched to enable it to be attached
• The profiled side must face the tubing component that is being connected
Step 2
Position the connecting tube and slide one pull-ring half over the lipped pipe end.
| QUICK CONNECT pull ring | Two-parted pull ring |
|---|---|
| First, attach the pull-ring half without the toggle clip | We recommend separating the two halves of the pull-ring beforehand |
Ensure that the pipework components are properly aligned and the U-shaped seal is in the correct position.
Note: We recommend that when fitting horizontal pipelines where condensate occurs, any points at which the U-shaped seal is glued should be positioned on top, and the connecting points of the pull-ring halves are horizontal. This ensures the maximum possible tightness at the lowest point of the connection.
Step 3
Press the second pull-ring half onto the lipped pipe ends.
Please note: When closing the pull-ring, the U-shaped seal must not bunch or fold.
| QUICK CONNECT pullring | Two-parted pull ring |
|---|---|
| Place the clasp over the closing hook and close the clip. | Tighten the bolts evenly with a torque of 10 Nm |
| To prevent the connection from loosening accidentally (such as due to vibration) tighten the bolt with a 10 Nm torque on the mounting face |
Please note: A bolt tightening torque of 10 Nm is necessary for the QUICK CONNECT pull-ring, or 25 Nm for the two-part pull-ring, for shock explosion proof connection of up to 3 bar over-pressure.